THE new cookbook by Eloise Head – AKA Fitwaffle – came out yesterday and it’s full of delicious recipes – and none of them require an oven!
------Advertisement-----
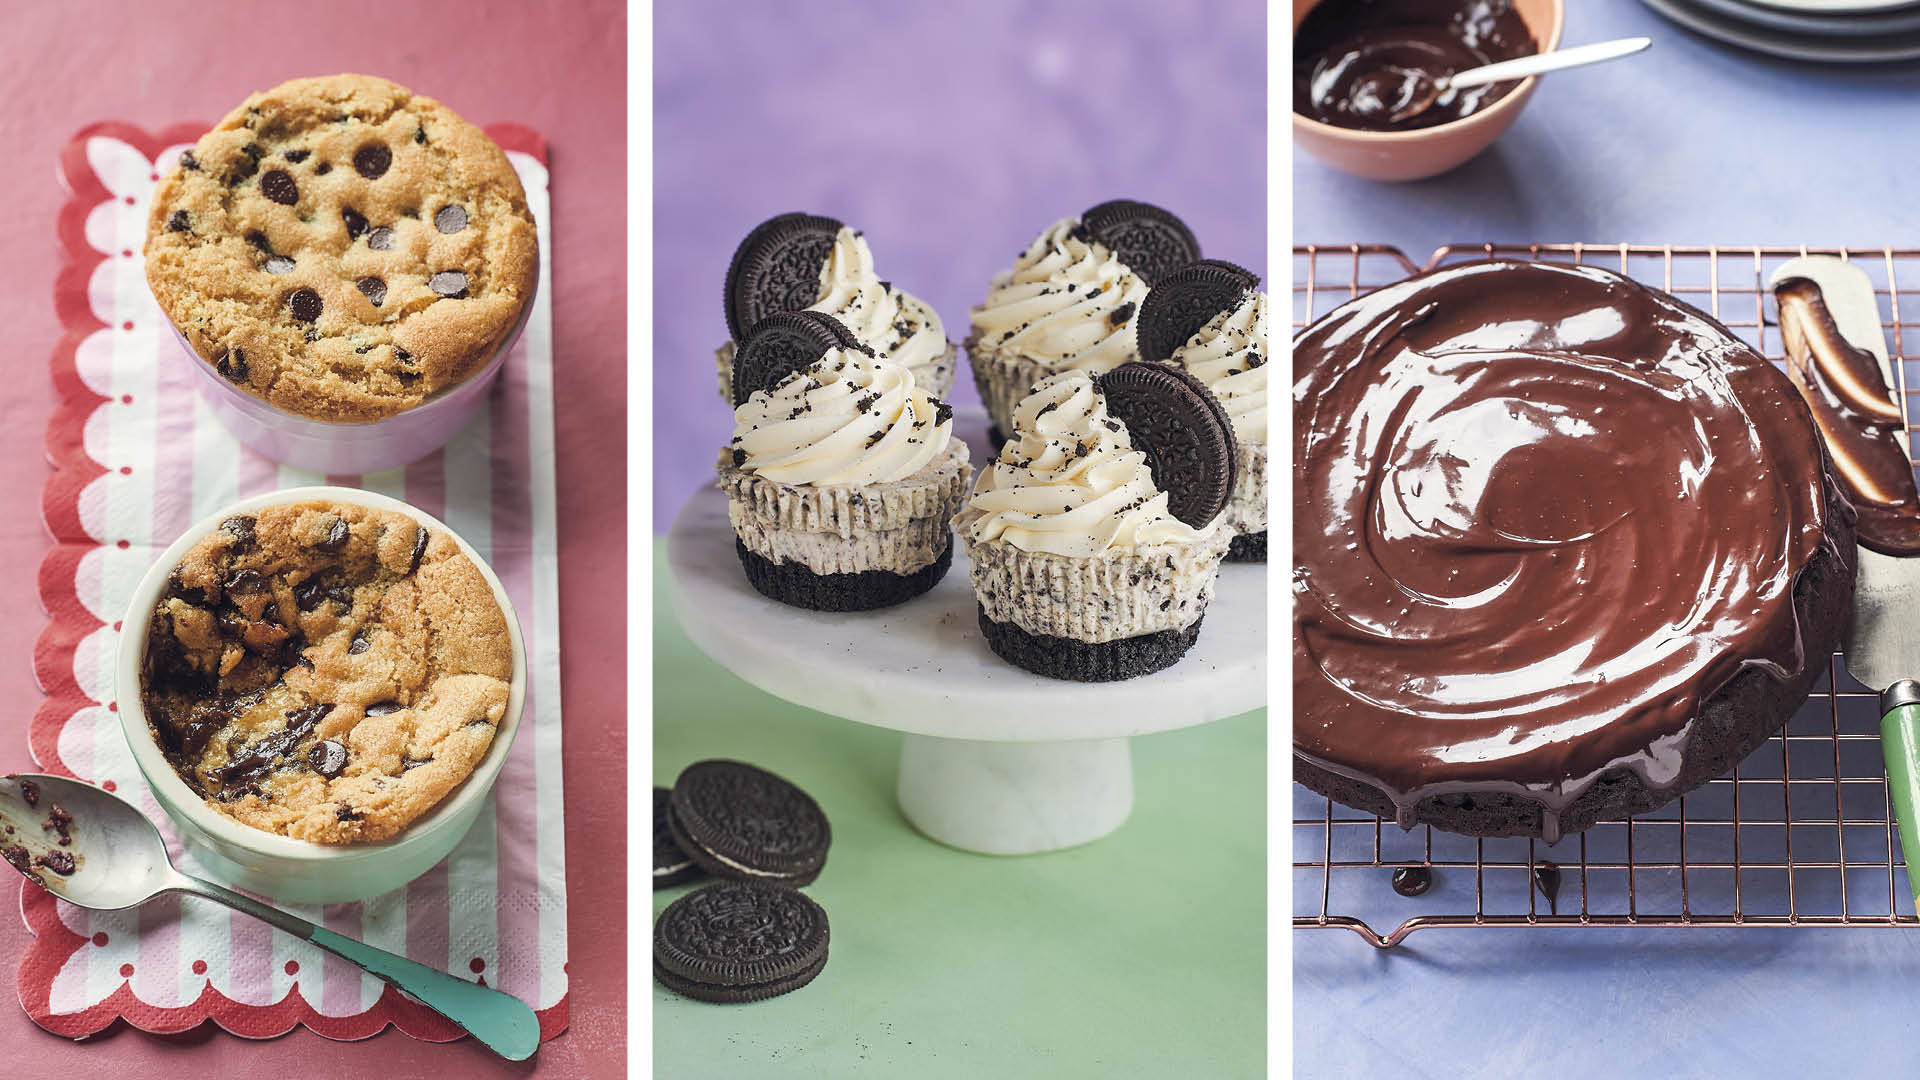
We’ve selected three of our faves for you to try this weekend, from a microwave chocolate cake to air-fryer cookie cups and Oreo cheesecakes.
The book is packed with recipes for cheesecakes, brownies, ice creams and savoury treats that anyone can whip up in a fridge, freezer, air-fryer or even a microwave.
------Advertisement-----
Plus, there are sections featuring recipes that require just five or less ingredients, as well as one-trays for swerving the washing-up.
And if you’re planning some Easter baking, look no further, as there are heaps of fun ideas for cute Easter, cool Halloween and festive Christmas bakes.
------Advertisement-----
Cookbook author Eloise Head is the most-followed woman in UK food across social media – and her new book features her fans’ favourites from her TikTok channel.
And her third cookbook, (Ebury Press), is sure to be a bestseller, just like her earlier books.
So if you’re keen to save on energy costs and have already been using your oven less than ever, these fuss-free recipes will mean you can still enjoy some delicious treats on the cheap.
Microwave Chocolate Cake
No one will ever know this was made in a microwave – it’s unbelievably soft and moist and you don’t even need eggs!
Serves: Eight
Most read in Fabulous
Takes: 20 minutes, plus cooling
Ingredients:
For the cake:
150g plain flour
100g granulated sugar
60g cocoa powder
2tsp baking powder
90g unsalted butter, melted
380ml warm water
For the topping:
150g dark chocolate, broken into pieces
150ml double cream
Method:
For the cake:
- Grease and line an 18cm round microwave-safe cake mould with nonstick baking paper.
- In a large mixing bowl, mix together the flour, granulated sugar, cocoa powder and baking powder using a balloon whisk until combined.
- Pour in the melted butter or vegetable oil and warm water and beat until runny and smooth, then pour into your cake mould.
- Microwave on medium heat for five to six minutes until a toothpick inserted into the centre of the cake comes out with a few moist crumbs on it.
- Check the cake about one minute before you think it’s cooked. If you overcook it, it can become dry and rubbery.
- Leave to cool slightly, then flip it upside down onto a wire rack and remove the baking paper, then leave to cool completely.
For the topping:
- Put the chocolate and cream into a microwave-safe jug or small mixing bowl and microwave on medium for one minute 20 seconds.
- Leave to stand for one minute, then stir gently until smooth and combined.
- Transfer to a serving plate and pour the ganache over the cooled cake, letting it drip over the edges slightly, and smooth it out.
- Let the ganache set at room temperature, then cut into eight slices and serve.
- Store in an airtight container in the refrigerator for up to four days, and if eating the cake after it’s been in the refrigerator, leave at room temperature for at least 30 minutes before serving.
Cookie Cups
Sometimes you just want a warm chocolate chip cookie all to yourself to eat with a spoon, and these are easy to make in the air fryer in 20 minutes.
Serves: Two
Takes: 20 minutes
Ingredients:
50g unsalted butter, softened
40g light brown sugar
20g granulated sugar
1 egg yolk
1/2tsp vanilla extract
70g plain flour
1/4tsp bicarbonate of soda
1/4tsp salt
60g chocolate chips, plus extra for the top
Method:
- Preheat your air fryer to 160˚C.
- In a small mixing bowl, beat the butter and both sugars with a spoon to form a paste.
- Add the egg yolk and vanilla extract and mix until combined, then fold in the flour, bicarbonate of soda and salt until just combined (don’t overmix).
- Fold in the chocolate chips, then divide the dough between two ramekins and sprinkle more chocolate chips on top.
- Place in the centre of your air fryer and bake for 10-15 minutes (cooking times will vary between air fryers).
- Leave to stand for two minutes, then grab a spoon and dig in – best served straight away, but you can reheat them in the air fryer for two to three minutes up to 1 day after baking.
- To bake in the oven instead: Cook at 200˚C/180˚C fan/gas mark 6 for 15-20 minutes.
Cookies & Cream Mini Cheesecakes
These are so quick and easy to make – and they’re sweet and creamy with that crunchy biscuit base, perfect for any occasion.
Serves: nine
Takes: 20 minutes, plus three hours chilling
Ingredients:
For the base:
150g cookies and cream biscuits (I use Oreos)
45g unsalted/salted butter, melted
For the filling:
250ml cold double cream
350g full-fat cream cheese, at room temperature
100g icing sugar
55g (about five) cookies and cream biscuits, finely crushed
To decorate:
200ml cold double cream
Two cookies and cream biscuits, finely crushed
Four and a half cookies and cream biscuits, cut in half
Method:
For the base:
- Line a cupcake tray with nine muffin liners. Alternatively, you can use 7.5cm mini cheesecake rings.
- Put the biscuits into a food processor and process until finely crushed (Alternatively, put them into a plastic bag and crush with a rolling pin).
- Tip into a medium mixing bowl, then pour in the melted butter and mix with a spoon until fully combined.
- Press the mixture firmly into the bottom of your muffin liners or rings with the back of a spoon, then pop in the refrigerator while you make the filling.
For the filling:
- In a large mixing bowl, whip the cream with an electric hand mixer until stiff peaks form.
- In a separate large bowl, beat together the cream cheese and icing sugar with the electric mixer until just combined, then fold in the whipped cream with a rubber spatula until just combined, followed by the crushed biscuits (Be careful not to overmix as this can make the cheesecakes go runny).
- Remove the chilled bases from the refrigerator, then spoon in the filling, smoothing it out to the edges and pressing it down on to the bases to avoid any gaps.
- Chill in the refrigerator for at least three hours, until completely set.
To decorate:
READ MORE SUN STORIES
- When ready to decorate, whip the cream to stiff peaks and transfer to a piping bag with your favourite piping nozzle.
- Pipe the whipped cream onto the cheesecakes, then decorate with the crushed and halved biscuits, as shown in the photo.
- Serve straight away or store in the refrigerator for up to three days.
For more recipes, follow Eloise Head on Instagram , on TikTok and on YouTube .